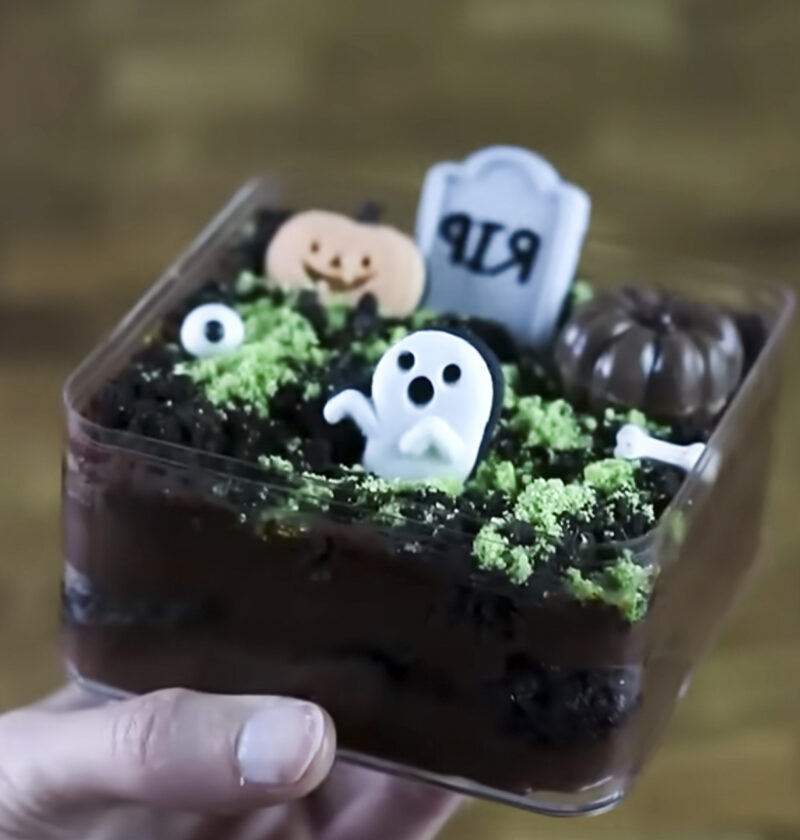
Create an informal calm weekend breakfast atmosphere. Think of the soft sound of a spoon hitting a ceramic, the friendly sound of chattiness and maybe a slight sweet fragrance from the kitchen. It’s the spooky spirit I want to convey to your house with these super sweet graveyard pudding cups. Halloween, or just an afternoon in the fall, demands sweets to be both sweet and somewhat funny. We’re talking about a dessert that’s as sweet as it is pretty but doesn’t create a haunted disaster in your kitchen.
You know how some holiday recipes feel like they demand a full-day commitment and a post-apocalyptic clean-up? Not these. These graveyard pudding cups are genuinely easy to assemble, making them a fantastic project for any skill level, especially with kids. We’ll layer rich chocolate pudding, crunchy “dirt” made from crushed cookies, and some fun candy decorations to create miniature edible scenes. It’s a simple concept, but the results are always impressive and oh-so-satisfying. Plus, I’ll share my best tips for keeping the process smooth and your countertops clean. Ready to get started on some deliciously eerie fun?
Before we dig into the full recipe, let’s talk about why these graveyard pudding cups are such a win. First, they’re individual portions, which means easy serving and no messy cutting for you. Secondly, they’re incredibly versatile. You can go as simple or as elaborate with your decorations as your heart desires. Think about it – a rich, dark chocolate base, contrasting with the crumbly texture of cookie “earth,” topped with playful candy figures. It’s a dessert that tells a story in every single cup.
Another major bonus? They’re perfect for making ahead. That’s right, you can assemble these beauties hours, or even a day, before your party. This frees you up to enjoy your guests (or just relax!) instead of scrambling in the kitchen at the last minute. The chilling time also allows all those lovely flavors to marry and the pudding to set up perfectly, giving you that delightful creamy coolness with every bite. The rich, dark chocolate pudding, smooth and cool on the tongue, provides a delightful contrast to the slightly crunchy cookie ‘dirt’. It’s a sensory treat from start to finish.
Graveyard pudding cups
Dig into layers of creamy chocolate, crushed cookies, and playful Halloween decor for a ghoulishly good treat.
Ingredients
-
-
- 2 (3.9 oz) packages instant chocolate pudding mix
-
- 4 cups cold milk (dairy or non-dairy)
-
- 1 (14.3 oz) package Oreo cookies, finely crushed
-
- 12 Milano cookies or similar rectangular cookies
-
- 1 tube black gel icing
-
- Assorted Halloween candies (gummy worms, candy corn, ghost marshmallows, candy pumpkins)
-
- 6 clear serving cups or jars (6-8 oz capacity)
-
Necessary Utensils & Equipment
Instructions
-
-
-
- In a large mixing bowl, whisk together the instant chocolate pudding mix and cold milk. Whisk vigorously for about 2 minutes until the mixture thickens.
-
- Let the pudding sit for 5 minutes to set up even more. Don’t rush this part – patience here ensures beautifully sturdy layers!
-
- While the pudding sets, prepare your “graveyard dirt.” Place Oreo cookies (without the cream filling, if you prefer less sweetness, though I usually keep it in!) into a food processor and pulse until finely crushed, resembling fresh earth. If you don’t have a food processor, place them in a zip-top bag and crush with a rolling pin.
-
- For the tombstones, take your Milano cookies. Use a small knife or toothpick to carefully write “RIP” or draw small cross shapes onto each cookie with the black gel icing. Set these aside to dry; a few minutes is usually enough.
-
- Now it’s time to assemble! Spoon about 2-3 tablespoons of crushed Oreos into the bottom of each serving cup, creating your first layer of “dirt.”
-
- Next, spoon a layer of chocolate pudding over the cookie crumbs, filling the cup about halfway. Use a rubber spatula to gently smooth the top if you like, keeping the sides of the cup clean.
-
- Add another generous layer of crushed Oreos, creating a realistic “dirt” mound on top of the pudding. You’ll love watching the creamy chocolate pudding swirl with the dark cookie crumbs, creating that perfect ‘freshly dug’ look.
-
- Insert one “RIP” cookie tombstone into the top layer of crushed Oreos in each cup, standing it upright to anchor your graveyard scene.
-
- Decorate your graveyards! Arrange gummy worms so they look like they’re crawling out of the dirt, scatter candy corn, or add small ghost marshmallows or candy pumpkins. Let your imagination lead the way!
-
- Chill the pudding cups for at least 30 minutes before serving. This helps everything set beautifully and keeps the pudding nice and cold for that optimal creamy-crunchy contrast.
-
-
I have always been a patient cook when I tried to make these for the first time. I was very excited about their completion so I hurried through the pudding setting time. The result? A slightly soupier, not as solidly defined ‘graveyard’ but still very tasty that just didn’t have the solid layers that I had envisioned. I always let that pudding sit for 5 minutes now – it makes such a difference in the structure!
For super vibrant “dirt” that really pops against the pudding, make sure your Oreo cookies are crushed very finely. A food processor is a game-changer here, creating a uniform, rich dark crumb.
Beyond the basic recipe, there’s a whole world of creative fun to be had with your graveyard pudding cups. They’re a fantastic way to let your imagination run wild, especially if you have little ones who love to help in the kitchen.
Getting Creative with Your Graveyard Design
Making these isn’t just about following steps; it’s an opportunity for edible artistry!
- Customizing the “Dirt”: While Oreos are classic for their dark color and flavor, don’t feel limited. Crushed chocolate wafers, shortbread cookies, or even a mix of different chocolatey biscuits can create varied “soil” textures and shades. You could even add a tiny pinch of instant coffee to the cookie crumbs for an even darker, richer-looking soil that adds a subtle flavor depth.
- Tombstone Transformations: Milano cookies are great, but think about other options! Shaped sugar cookies, pretzel sticks for rustic markers, or even thin slices of chocolate bars can become unique headstones. Use different colored gel icing – maybe white for ghostly epitaphs or orange for a spooky glow – to personalize each one.
- Spooky Scene Setters: This is where the real fun begins! Gummy worms are a classic, but consider other creepy crawlies. Candy spiders, plastic vampire teeth, miniature pumpkin candies, or even edible googly eyes can bring your graveyard scene to life. We’ve even used chocolate-covered pretzel sticks to make spooky trees. Just remember, the more variety, the more engaging your edible graveyard becomes.
- Themed Layers: Want to get truly adventurous? Add a thin layer of green-tinted coconut flakes (just mix a few drops of green food coloring with shredded coconut) for “grass” in your graveyard. Or, swirl in a bit of raspberry sauce for a gruesome “bloody” effect near the bottom of the cups. Just be sure not to overdo the liquid, or your pudding layers might get too soft.
These creative touches don’t just make the dessert look good; they make the entire process an activity. It’s about bringing people together to craft something unique and delicious.
Spooky Treat Awaits
Whether you’re a seasoned baker or just starting out, a few clever tips can ensure your graveyard pudding cups are a delicious and presentation-perfect hit.
Variations on the Theme
- White Chocolate Ghosts: Instead of Milano cookies, you could use Nilla wafers and draw white chocolate ghosts on them with a food-safe marker. Or, melt some white chocolate chips, dip shortbread cookies, and then, while still wet, add two mini chocolate chips for eyes before they set. They look so cute peering out from the “dirt”!
- Different “Dirt”: Experiment with crushed chocolate wafers or even crumbled brownies for varied textures. For a slightly different flavor profile, try crushing chocolate graham crackers. The subtle cinnamon notes can add an unexpected warmth to your spooky treat. You can also mix in a little crushed pretzel for a salty-sweet crunch.
- Fruit Fillings: Add a layer of raspberry coulis or cherry pie filling between pudding layers for a “bloody” effect. You could even use fresh raspberries or chopped strawberries for a fresher, brighter taste that cuts through the richness of the chocolate. Just be mindful of how much moisture fresh fruit releases; a thin layer is best.
Preventing a Mess in the Kitchen
Let’s face it, cooking should be fun, not a clean-up nightmare. Here are my favorite ways to keep things tidy when making these delightful cups:
- Keep a damp cloth handy while crushing cookies and assembling the cups; those dark crumbs *love* to scatter! I always keep one right next to my workspace. It’s like a secret weapon against the inevitable chocolate dust that seems to multiply on its own.
- Use a spoon with a deeper bowl to transfer pudding to cups; it helps minimize drips down the sides. A small ice cream scoop or a soup spoon works wonders here. Try to keep the spoon close to the cup’s rim as you release the pudding, aiming for a smooth drop.
- Prepare all your components (crushed cookies, decorated tombstones, sorted candies) before starting assembly. This way, you’re not scrambling with sticky hands. This is what we call “mise en place” in the cooking world – everything in its place before you start. It drastically cuts down on stress and mess.
- Consider laying down some parchment paper or newspaper on your counter before you start. This creates an easy clean-up zone – just gather and toss when you’re done! It’s especially useful for containing rogue cookie crumbs.
Storage Savvy
You’ll definitely want to know how to keep these graveyard pudding cups fresh if you’re making them in advance or have leftovers (if that’s even possible!).
- These pudding cups store well in the refrigerator for up to 2-3 days. Make sure they are covered to maintain their freshness and prevent them from absorbing other fridge odors.
- Cover them loosely with plastic wrap to prevent the cookie crumbs from drying out or absorbing too much moisture from the pudding. If you can, place the plastic wrap directly on the surface of the pudding to prevent a “skin” from forming, especially if you’re not decorating immediately.
- If you’re making them ahead for a party, it’s best to add the gummy worms and other “crawly” candies closer to serving time so they don’t get too firm from the cold. Some candies can also “bleed” color if left in contact with moisture for too long, which might detract from your meticulously crafted graveyard scene.
These spooky treats are sure to bring smiles and maybe a few delightful shivers to your next gathering. They’re a playful way to celebrate and a testament to how simple ingredients can make for truly memorable moments.
So, are you ready to dig into some delightfully eerie fun in your kitchen? What’s your favorite part about making themed treats like these?
Frequently Asked Questions
Q: Can I use sugar-free pudding for this recipe?
A: Yes, absolutely! Sugar-free instant chocolate pudding mix works just as well. Just make sure to follow the package directions for the liquid amount, as some brands might vary slightly. The flavor and texture will still be fantastic for your graveyard cups.
Q: How far in advance can I make these graveyard pudding cups?
A: You can prepare these up to 2-3 days in advance. Just remember to cover them tightly with plastic wrap and store them in the refrigerator. For the best presentation, add the gummy worms and other soft candies closer to serving time to keep them fresh and pliable.
Q: What if I don’t have Milano cookies for the tombstones?
A: No problem! Rectangular shortbread cookies, graham crackers cut into rectangles, or even thin chocolate bars can be used. You can also use small pieces of white chocolate or fondant shaped into tombstones if you’re feeling extra crafty. The goal is a flat surface for your “RIP” message.
Q: My pudding didn’t set properly, what went wrong?
A: The most common culprit is not whisking enough or not giving it enough time to sit. Make sure you whisk vigorously for the full 2 minutes, then let it rest for the recommended 5 minutes before layering. Using very cold milk also helps! If it’s still too loose, try chilling it for an extra 15-30 minutes before assembly.
Q: Can I make these dairy-free?
A: Yes! Many brands of instant pudding can be made with non-dairy milk alternatives like almond, soy, or oat milk. Just check the pudding package for specific recommendations, as some brands might set better with certain types of non-dairy milk. The Oreos are typically dairy-free, but always check labels if you have strict dietary needs.