Follow this recipe and make it a family tradition every week and you’ll see it begins with a bit of imagination and a lot of laughter! Those ominously sweet witch finger cookies, that is, of course! Of course, these fun and slightly spooky little goodies are not reserved for Halloween only; they’ve become part of the Sunday dinner routine, particularly when we’re looking to liven things up a bit and inject some fun and whimsy into the dessert table. These are surprisingly easy to make, and always have a big reaction.
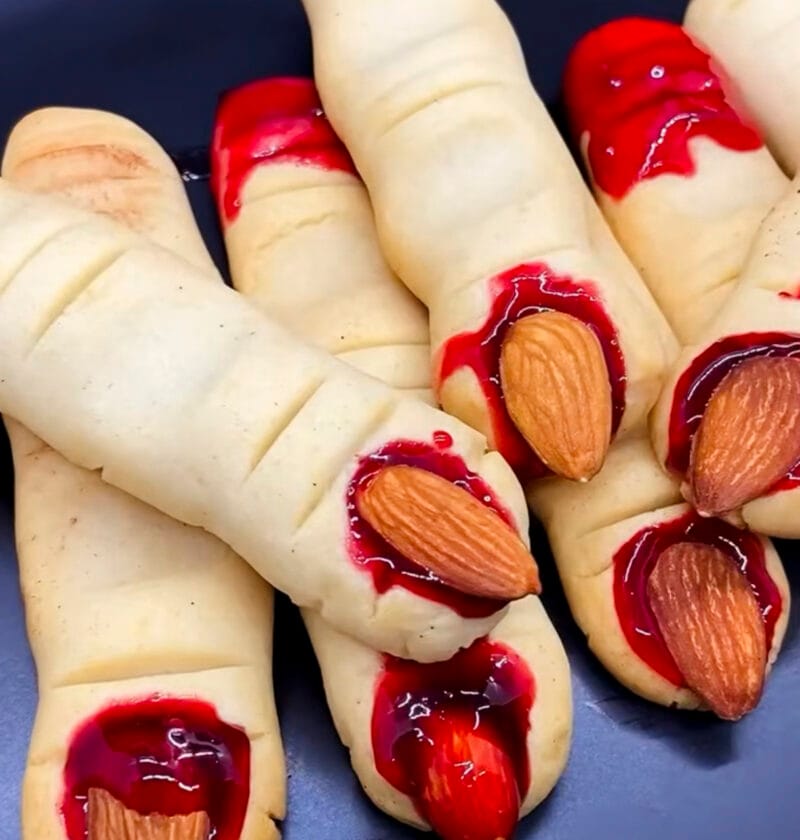
You will adore the way the shortbread dough comes together, ready to be moulded into the gnarled fingers, complete with an almond “fingernail” and a little crimson jam for the ultimate spooky finish. Beware of their appearance, because these cookies are delicious with a tender crumb and sweet almond flavor, sure to get them all eating more. Let’s bake and make some magic!
Witch finger cookie
These eerie, almond-tipped shortbread fingers bring a delightful shiver and sweet bite to any gathering.
Ingredients
-
-
- 1 cup (2 sticks) unsalted butter, softened
-
- 1 cup (200g) granulated sugar
-
- 1 large egg
-
- 1 teaspoon almond extract
-
- 2 ½ cups (300g) all-purpose flour
-
- 1 teaspoon baking powder
-
- ½ teaspoon salt
-
- A few drops green gel food coloring (optional)
-
- 48 whole blanched almonds (for 24 cookies)
-
- Red gel food coloring or raspberry jam (for garnish)
-
Necessary Utensils & Equipment
-
-
-
- Large mixing bowls
-
- Electric mixer (stand or hand)
-
- Measuring cups and spoons
-
- Baking sheets
-
- Parchment paper
-
- Small sharp knife or butter knife
-
- Wire cooling rack
-
-
Instructions
-
-
-
- Preheat your oven to 325°F (160°C). Line two baking sheets with parchment paper.
-
- In a large mixing bowl, using an electric mixer, cream together the softened butter and granulated sugar until it’s light and fluffy. This usually takes about 2-3 minutes.
-
- Beat in the egg and almond extract until they are well combined. If you’re using green food coloring, add a few drops now and mix until the color is even throughout the dough.
-
- In a separate bowl, whisk together the all-purpose flour, baking powder, and salt. Gradually add the dry ingredients to the wet ingredients, mixing on low speed until just combined. Be careful not to overmix; stop as soon as no dry streaks remain.
-
- Chill the dough for 20-30 minutes. This makes it much easier to handle and shape, preventing the cookies from spreading too much.
-
- Once chilled, take a small portion of dough (about 1 tablespoon) and roll it into a finger-like shape, roughly 3-4 inches long. You’ll want to make them slightly thinner than an actual finger, as they will expand a little while baking.
-
- Use a small knife or butter knife to gently press indents into the dough, mimicking knuckles. You can also pinch the dough slightly in the middle to create a more gnarled, realistic “knuckle” effect.
-
- Press a blanched almond onto one end of each finger to create the “fingernail.” If the almond doesn’t stick well, you can brush the end of the cookie with a tiny bit of water or egg wash before pressing it on.
-
- Place the shaped cookies on your prepared baking sheets, leaving about an inch between them.
-
- Bake for 10-12 minutes, or until the edges are lightly golden. You’re looking for a firm texture but no significant browning, as we want them to retain their pale, ghostly appearance.
-
- Carefully remove the cookies from the oven and let them cool on the baking sheets for a few minutes before transferring them to a wire rack to cool completely.
-
- Once cooled, gently lift the almond “fingernail” and apply a small dab of red gel food coloring or raspberry jam underneath, creating a creepy “bloody” effect. Press the almond back down to secure it. Repeat for all cookies.
-
- Serve these spooky treats and enjoy the delighted (or horrified!) reactions!
-
-
How to Perfect Those Spooky Fingers
They’re sure to be a success, and so much fun to make! However, there are a few baking secrets that can make all the difference, just like with any baking endeavor. After many batches I learned a thing or two including once on Sunday when I tried to hurry the chilling of the dough, and the end result was a dough that was too sticky to shape. So, this is a cookie recipe that is easy to shape and doesn’t frustrate because of patience with chilling the dough.
Shaping Secrets for Perfectly Ghoulish Fingers
The key to getting that authentically creepy look is in the shaping. Don’t aim for perfection – irregularities add to the charm!
- Chill Your Dough Properly: As mentioned, this is huge. A firm dough is easy to roll and manipulate. If your kitchen is warm, you might even pop the dough back in the fridge between batches of shaping.
- Vary the Finger Lengths and Thicknesses: Real fingers aren’t all uniform, right? Making some shorter, some longer, and varying the thickness slightly will give your collection a more natural, unsettling feel.
- Deep Knuckle Indents: When pressing for knuckles, don’t be shy. A deep indent will hold its shape better during baking and make the cookies look more realistic. You can even gently twist the dough at the ‘knuckles’ for extra gnarled appeal.
- Securing the Almond: If your almonds pop off after baking, next time try brushing the end of the cookie with a tiny bit of beaten egg white before pressing the almond on. It acts as a great edible glue.
Pro Tip: For an extra layer of flavor and aroma, lightly toast your blanched almonds in a dry pan for a few minutes before adding them. It really makes their nutty notes sing!
Storage and Make-Ahead Magic
You can definitely make these cookies ahead of time, which is super helpful for busy families!
- Dough Storage: The unbaked cookie dough can be wrapped tightly in plastic wrap and stored in the refrigerator for up to 3 days, or frozen for up to 3 months. If freezing, thaw it in the fridge overnight before shaping.
- Baked Cookie Storage: Once fully cooled, store your witch finger cookies in an airtight container at room temperature for up to 5 days. Layer them with parchment paper to prevent the almonds from scratching each other or the “blood” from smudging.
- Freezing Baked Cookies: You can also freeze baked, cooled cookies (before adding the “blood”) in an airtight container for up to 2 months. Thaw at room temperature, then add the red garnish just before serving.
Seeing these cookies laid out on a platter, with their grotesque details and glistening red “blood,” always brings a thrill of spooky delight. They’re a conversation starter, for sure.
Frequently Asked Questions
Can I make these cookies without almond extract?
Absolutely! If you have an almond allergy or simply don’t prefer the taste, you can swap the almond extract for vanilla extract. The cookies will still be delicious, just with a classic sugar cookie flavor rather than an almond one.
What if my cookies spread too much while baking?
This usually happens if the dough isn’t chilled enough or if the butter was too soft initially. Make sure your butter is softened but still cool to the touch, not melted. Chilling the dough for at least 30 minutes, or even an hour, really helps prevent spreading. If your kitchen is warm, chill the shaped cookies on the baking sheet for 10-15 minutes before baking.
Can I use different “blood” for the effect?
Of course! Raspberry jam or strawberry jam works wonderfully for a thicker, fruitier “blood.” For a more vibrant, eerie look, red gel food coloring mixed with a tiny drop of corn syrup can also provide a realistic, glistening effect. Chocolate syrup could also give a different, darker “blood” effect.
Are witch finger cookies suitable for children?
Definitely! While their appearance is spooky, the taste is purely sweet and delicious. Most kids get a kick out of their fun look. Just be mindful of any nut allergies if you’re serving them to a group, as they contain almonds.
How can I make these cookies even greener or more vibrant?
If you want a more intensely colored cookie, you can add a little more green gel food coloring to the dough. Remember, gel food coloring is more potent than liquid drops, so start with a few drops and add more gradually until you reach your desired shade.