My kids always tell me to make this. That beautiful, crispy, oniony goodness dipped in a tangy sauce? It’s in demand for a reason. But let’s be real, deep-frying at home can be a bit of a production. You’ve got the oil, the mess, and, well, a whole lot of calories that might make you think twice.
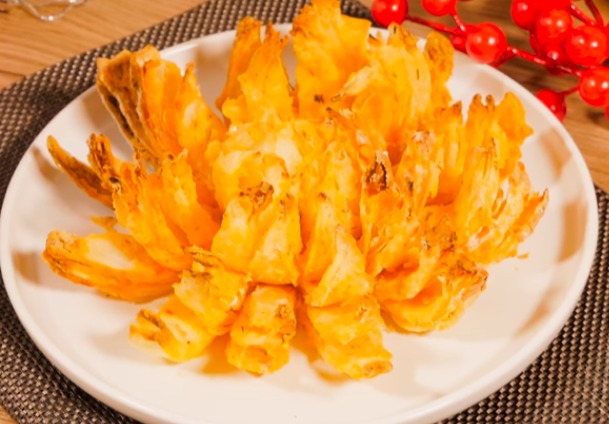
That’s where these Air Fryer Crispy Mini Blooming Onions come in! We’re taking all the flavor and fun of the original, making it smaller, easier, and a whole lot lighter thanks to your air fryer. You’ll get that fantastic crunch without all the deep-fried guilt. It’s the perfect appetizer or side dish that’ll impress everyone, and you’ll love how simple it is to whip up. Trust me, once you try these, you’ll be making them all the time.
Air Fryer Crispy Mini Blooming Onions
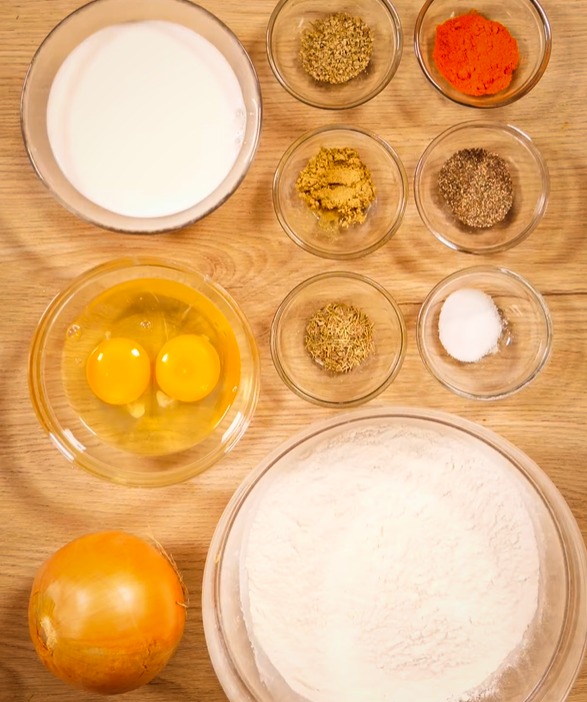
Ingredients
-
-
- 2 medium yellow onions
-
- 1 cup all-purpose flour
-
- 1/4 cup cornstarch
-
- 1 tsp paprika
-
- 1 tsp garlic powder
-
- 1/2 tsp onion powder
-
- 1/2 tsp salt, plus more to taste
-
- 1/4 tsp black pepper
-
- 2 large eggs
-
- 1/4 cup milk
-
- 1 tsp hot sauce (optional, for a kick)
-
- Cooking spray or light oil for air fryer
-
- For the Dipping Sauce (suggested):
- 1/2 cup mayonnaise
- 2 tbsp ketchup
- 1 tbsp prepared horseradish
- 1/2 tsp Worcestershire sauce
- 1/4 tsp paprika
- Pinch of salt and pepper
- For the Dipping Sauce (suggested):
-
Instructions
-
-
- Prepare the Onions: Peel the onions and trim the top, leaving the root end intact (this holds the onion together). Place the onion root-side up. Using a sharp knife, make 8-12 even cuts from the top down towards the root, stopping about 1/2 inch from the root. Don’t cut all the way through! Gently separate the “petals” so the onion opens up, resembling a flower. Place them in a bowl of ice water for at least 15 minutes to help them open further and crisp up.
-
- Set Up Breading Stations: In one shallow bowl, combine the flour, cornstarch, paprika, garlic powder, onion powder, salt, and pepper. In a second shallow bowl, whisk together the eggs, milk, and optional hot sauce until smooth.
-
- Coat the Onions: Remove an onion from the ice water and pat it very dry with paper towels, especially between the petals. Dredge the onion in the flour mixture, making sure to get the flour into all the crevices. Shake off any excess. Dip it into the egg mixture, ensuring it’s fully coated. Let excess drip off. Finally, return the onion to the flour mixture for a second coat, pressing gently to make sure the flour adheres well. Repeat for the second onion.
-
- Preheat Air Fryer: Preheat your air fryer to 375°F (190°C). Spray the air fryer basket lightly with cooking spray or brush with oil.
-
- Air Fry: Carefully place one coated onion in the air fryer basket. You might need to gently spread the petals if they’ve closed up a bit. Lightly spray the onion all over with cooking spray. Air fry for 9 minutes, then carefully flip the onion, spray again, and cook for another 9 minutes, or until golden brown and crispy. Repeat with the second onion. The key here is not to overcrowd your air fryer. If you pack them in, they won’t get crispy.
-
- Make the Dipping Sauce: While the onions are cooking, combine all dipping sauce ingredients in a small bowl and whisk until smooth. Taste and adjust seasonings as needed.
-
- Serve: Once cooked, carefully remove the crispy mini blooming onions from the air fryer. They’ll be hot! Season with a pinch more salt if desired and serve immediately with the prepared dipping sauce. Enjoy that audible crunch!
-
Expert Tips for Success
Making a blooming onion, even a mini air-fried one, can feel a little intimidating at first. But trust me, with a few pointers, you’ll be a pro in no time. These tips are here to help you get the best possible results every time you make this dish.
My first go at these mini blooming onions didn’t quite hit the mark. I was so excited that I rushed the drying process after the ice bath. The result? A coating that was a bit gummy and didn’t stick as well as I wanted. It’s a small detail, but it really makes a world of difference. A truly dry onion is your secret weapon for a wonderfully crisp exterior.
Getting the Perfect Bloom
The cut is arguably the most crucial step for that signature “bloom.” You want petals that open up beautifully without falling apart.
Pro Tip: After making your cuts, give the onion a quick, gentle squeeze from the top down. This helps open the petals without tearing them from the root. Don’t be afraid to be firm, but stay gentle enough not to detach the segments.
- Sharp Knife is Your Friend: A dull knife will make this job much harder and could lead to uneven cuts or tearing. Keep your blade honed!
- Root End is Sacred: That small disc at the root end is what holds everything together. Cutting too close to it, or through it, will make your onion crumble.
- Ice Bath Magic: Don’t skip the ice water soak! It not only helps the petals open wider but also crisps up the onion itself, which pays off in the final texture.
Flavor Twists & Variations
This recipe is a fantastic starting point, but don’t be shy about making it your own.
- Spice It Up: Add a pinch of cayenne pepper to the flour mixture for more heat, or smoked paprika for a deeper flavor. A dash of chili powder also works well.
- Herbaceous Notes: Dried herbs like oregano, thyme, or even a bit of Italian seasoning can change the flavor profile. Just a half teaspoon can make a difference.
- Different Dipping Sauces: While my recommended sauce is classic, feel free to experiment. Think sriracha mayo, a honey mustard dip, or even a garlic aioli.
- Cheese Please: For an extra indulgent twist, you could sprinkle a tiny bit of finely grated Parmesan cheese into the second flour coat.
Making Ahead & Storage
Blooming onions are best enjoyed fresh, but you can do some prep work.
- Prep Ahead: You can cut and soak the onions in ice water a few hours in advance. Keep them in the fridge. You can also mix your dry flour blend and dipping sauce ahead of time.
- Reheating: If you have leftovers (which is rare, let’s be honest!), the best way to reheat them is back in the air fryer at 350°F (175°C) for 3-5 minutes. This will bring back some of their crispness. The microwave will just make them soggy, and nobody wants that.
- Freezing: I don’t honestly recommend freezing these. The texture of the onion changes significantly once frozen and thawed, and it won’t be nearly as crispy or delicious.
Dipping Sauce Showdown
The dipping sauce is half the fun! Here’s a quick look at some popular choices you might enjoy with your air fryer blooming onions.
| Sauce Name | Key Flavors | Best For |
|---|---|---|
| Classic Blooming Onion Sauce | Creamy, tangy, a little spicy with horseradish | Traditionalists, those who love a kick |
| Spicy Aioli | Garlicky, creamy, with a bright chile spice | Garlic lovers, modern twists |
| Ranch Dressing | Herby, cool, buttermilk tang | Kids, anyone who enjoys a cool, savory dip |
| Honey Mustard | Sweet, tangy, mild mustard flavor | Sweet & savory fans, milder palates |
Frequently Asked Questions
Can I use a regular oven instead of an air fryer?
Yes, you can! Preheat your oven to 400°F (200°C). Place the coated onions on a wire rack set over a baking sheet. Spray them generously with cooking spray. Bake for 25-35 minutes, flipping halfway through and spraying again, until golden brown and crispy. Keep in mind they might not get quite as crispy as in an air fryer, but they’ll still be delicious!
How do I prevent my blooming onions from getting soggy?
The biggest culprits for sogginess are excess moisture and overcrowding the air fryer. Always ensure your onion is thoroughly dried after the ice bath. Also, cook them in a single layer, allowing enough space for air to circulate freely. Don’t skimp on the cooking spray, as that helps with the crisping.
What’s the best way to cut a blooming onion without it falling apart?
Start by peeling the onion and trimming just the very top. Leave the root end intact, as this acts as the “core” that holds the petals. Place the onion root-side up. Make 8-12 even cuts from the top down, stopping about 1/2 inch from the root. Using a sharp knife is important here. After cutting, gently open the petals and place it in ice water.
Can I make these gluten-free?
Absolutely! Simply substitute the all-purpose flour with a 1:1 gluten-free flour blend. Ensure your cornstarch is also gluten-free (most are, but it’s worth checking). The rest of the ingredients should generally be fine, but always check labels for hidden gluten if you have severe sensitivities.
What’s your favorite sauce to dunk a crispy blooming onion in?