

I remember the first time i made cookies.It was a mess!! But as the time pregresses, I got extremely good at it. In fact, there is something truly exciting about baking and decorating cookies. The vibrant colors, the intricate designs, the sheer joy on someone’s face when they receive a beautifully decorated treat – it’s an experience unlike any other. But if you’ve ever felt intimidated by the delicate art of cookie decorating, you’re not alone. Many aspiring bakers look at elaborate royal icing designs and think, “I could never do that!”
That’s where a fantastic cookie decorating kit comes in. Think of it as your friendly guide, providing all the essential tools and often the core ingredients to get you started on your delicious journey. I remember my own first venture into cookie decorating, armed with a basic kit, feeling a mix of excitement and trepidation. What I quickly learned is that these kits aren’t just for professionals; they’re designed to empower anyone, from kids to adults, to create something beautiful and tasty. This guide will walk you through everything you need to know to pick the perfect cookie decorating kit and start piping like a pro, even if you’ve never held a piping bag before!
Key Takeaways
- Understand what components make up a high-quality cookie decorating kit.
- Explore various types of kits tailored for different skill levels and occasions.
- Identify the essential tools and ingredients commonly found in a comprehensive kit.
- Learn actionable tips for beginners to achieve beautiful cookie decorating results.
What Makes a Great Cookie Decorating Kit?
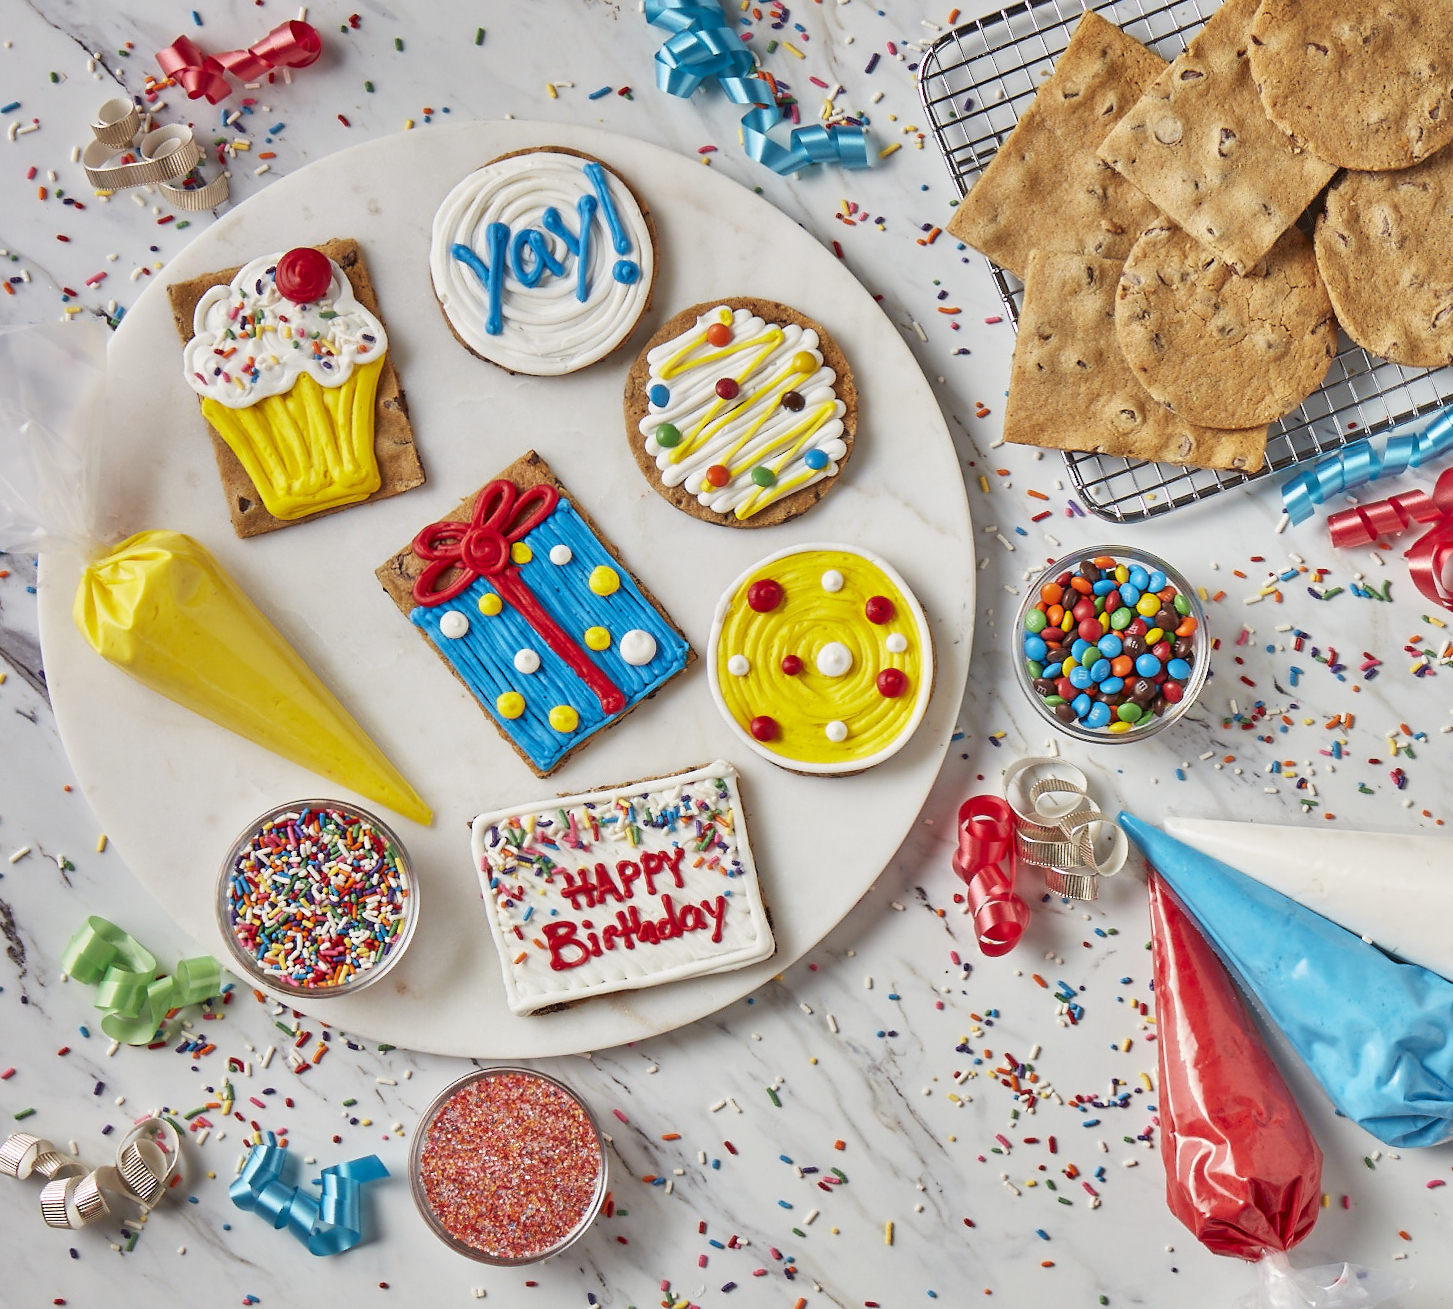
Image credit: send.greatamericancookies.com
When you’re sifting through options for a cookie decorating kit, it’s easy to get overwhelmed by the sheer variety. A truly great kit isn’t just a collection of random items; it’s a thoughtfully curated set that provides a seamless and enjoyable decorating experience. From my experience, the best kits strike a balance between quality, completeness, and ease of use, especially for beginners.
First and foremost, the foundation of any decorated cookie is, well, the cookie itself. Many kits come with pre-baked sugar cookies, which is a fantastic shortcut for anyone wanting to jump straight into the fun part. If a kit doesn’t include cookies, it often provides a reliable sugar cookie mix or even a recipe, ensuring you have the perfect canvas for your edible art. The texture and taste of your cookie base are crucial; a good kit understands this and sets you up for success from the start.
Next up is the icing. Most professional-looking decorated cookies use royal icing, known for its ability to dry hard and smooth, allowing for intricate details. A good cookie decorating kit will include either pre-made royal icing in piping bags, a mix to prepare your own, or the essential ingredients like meringue powder and powdered sugar. The convenience of pre-made icing cannot be overstated for new decorators; it bypasses the learning curve of getting the consistency just right for outlining and flooding.
Finally, the tools. This is where a kit truly shines. Look for kits that include a variety of piping bags, different decorating tips, food coloring gels for vibrant hues, and an assortment of sprinkles. Some advanced kits might even include a scribe tool for correcting icing mistakes or moving sprinkles, and edible markers for adding fine details. The quality of these tools makes a big difference in your decorating journey, ensuring they’re easy to use and durable enough for multiple baking sessions.
Types of Cookie Decorating Kits for Every Occasion

The beauty of cookie decorating kits is their versatility. There’s a kit out there for almost every skill level and every celebration you can imagine. Understanding the different types can help you pinpoint the perfect one for your specific needs, whether it’s a quiet afternoon activity or a lively party project.
Easy Cookie Decorating Kits for Beginners
If you’re just dipping your toes into the world of edible art, an easy cookie decorating kit for beginners is your best friend. These kits typically feature simple designs, pre-baked cookies, and ready-to-use royal icing. They often focus on basic techniques like outlining and flooding, making them perfect for building confidence. I always recommend these for first-timers; they take away the stress of baking and mixing, letting you focus purely on the decorating fun.
Kids Cookie Decorating Kits and Family Fun
Cookie decorating isn’t just for adults; it’s a fantastic kids cookie decorating activity and a wonderful way to engage the whole family. Kids cookie decorating kits often come with larger, simpler cookie shapes, bright, easy-to-handle icing pouches, and plenty of sprinkles. They prioritize fun over perfection, encouraging creativity. For a fun family cookie decorating project, these kits are unbeatable, fostering togetherness and delicious memories.
- **Birthday Party Cookie Decorating Activity:** Many kits cater specifically to birthday themes, offering shapes like cakes, balloons, or even favorite cartoon characters. These make for a delightful and interactive birthday party cookie decorating activity.
- **No-Bake Cookie Decorating Kits for Toddlers:** For the very youngest bakers, no-bake cookie decorating kits for toddlers exist, often using crackers or pre-made biscuits and simpler icings like buttercream or even edible glues and candies.
Holiday and Seasonal Cookie Decorating Kits
Holidays are synonymous with special treats, and cookie decorating kits rise to the occasion. Whether it’s a Christmas cookie decorating ideas for kids session, a spooky Halloween theme, or a spring-themed Easter design, holiday baking activity kits are immensely popular. They come with seasonal cookie cutters, appropriately colored icing, and festive sprinkles. These kits make it incredibly easy to create themed treats without having to source individual components, making your holiday preparations a breeze.
DIY Sugar Cookie Decorating Boxes and Advanced Options
For those who prefer a bit more customization or already have some basic skills, a DIY sugar cookie decorating box might be more appealing. These kits often include the dry ingredients for making royal icing, sometimes even a sugar cookie recipe, and a more extensive array of decorating tips and food coloring gels. They allow for a deeper dive into the craft, giving you the freedom to bake your own cookies and mix your own icing. Some even cater to specific dietary needs, offering gluten-free cookie decorating kit options.
Essential Tools You’ll Find in a Quality Kit
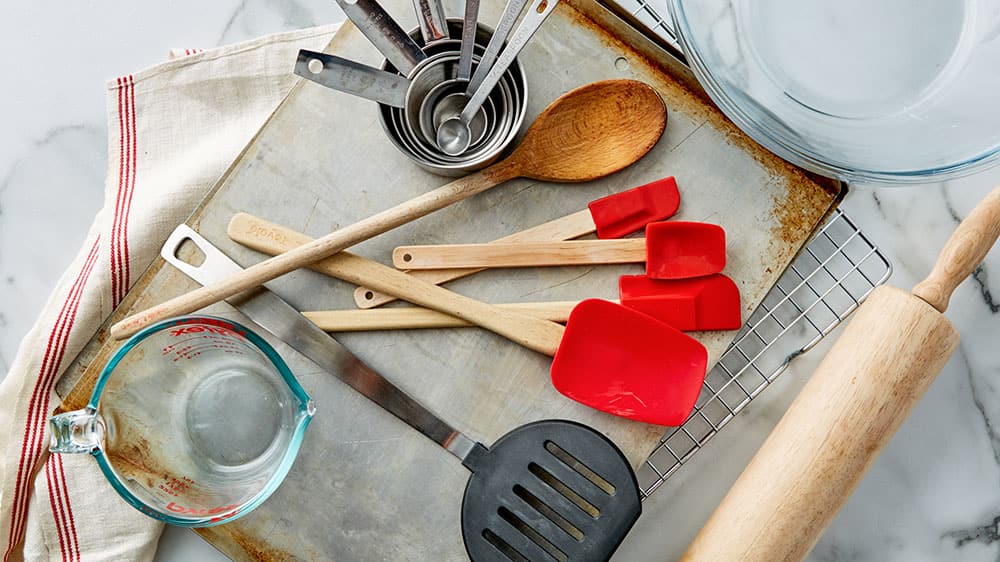
Image credit: www.bettycrocker.com
A good cookie decorating kit isn’t just about the cookies and icing; it’s about the tools that empower you to bring your vision to life. Having the right equipment can make all the difference in turning a messy attempt into a masterpiece. From my own collection, I’ve come to appreciate certain staples that truly make decorating easier and more enjoyable.
Piping Bags and Decorating Tips Set: These are the workhorses of cookie decorating. Good kits will include several disposable piping bags (or reusable silicone ones) and a small decorating tips set. Look for basic round tips (sizes #1, #2, #3 are great for outlining and fine details) and maybe a star tip for added texture. Investing in quality piping bags is worth it; cheap ones can burst under pressure.
Food Coloring Gels: Liquid food colors can thin out your royal icing, but food coloring gels deliver vibrant, concentrated color without compromising consistency. A kit with a variety of basic colors allows for endless customization. I’ve found that a little goes a long way with gels, so start with a tiny dab and mix thoroughly.
Sprinkles Assortment: What’s a decorated cookie without sprinkles? A generous sprinkles assortment adds instant sparkle and texture. Look for kits that include a mix of jimmies, nonpareils, and maybe even some edible glitter. These are especially fun for kids cookie decorating projects.
Cookie Cutters: While some kits provide pre-baked cookies, others come with a selection of cookie cutters. Simple shapes like circles, squares, or stars are versatile. Holiday-themed kits, of course, will include seasonal shapes. Having sturdy, well-made cookie cutters makes the baking process much smoother.
Scribe Tool or Toothpicks: Often overlooked, a scribe tool (or even a humble toothpick) is invaluable for manipulating wet icing, popping air bubbles, or nudging sprinkles into place. Many beginner-friendly kits now include these, and if not, a wooden toothpick works perfectly.
Edible Markers: For adding fine details, writing messages, or tracing designs, edible markers are a fantastic addition. They’re especially great for personalizing cookies and adding a touch of calligraphy without the fuss of a tiny piping tip.
Meringue Powder: If your kit requires you to mix your own royal icing, meringue powder is a key ingredient. It stabilizes the icing, helps it dry hard, and gives it that distinctive sheen. Understanding its role is a step towards mastering royal icing. To learn more about meringue powder and its uses, you can refer to this Wikipedia article on Meringue powder.
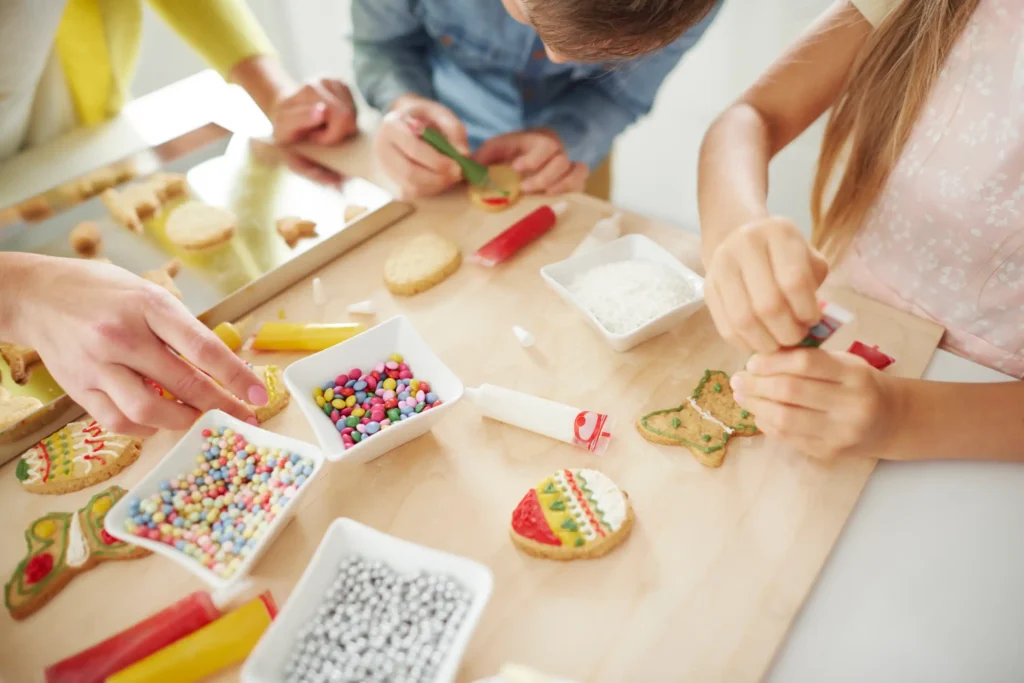
Tips for Decorating Success, Even as a Beginner
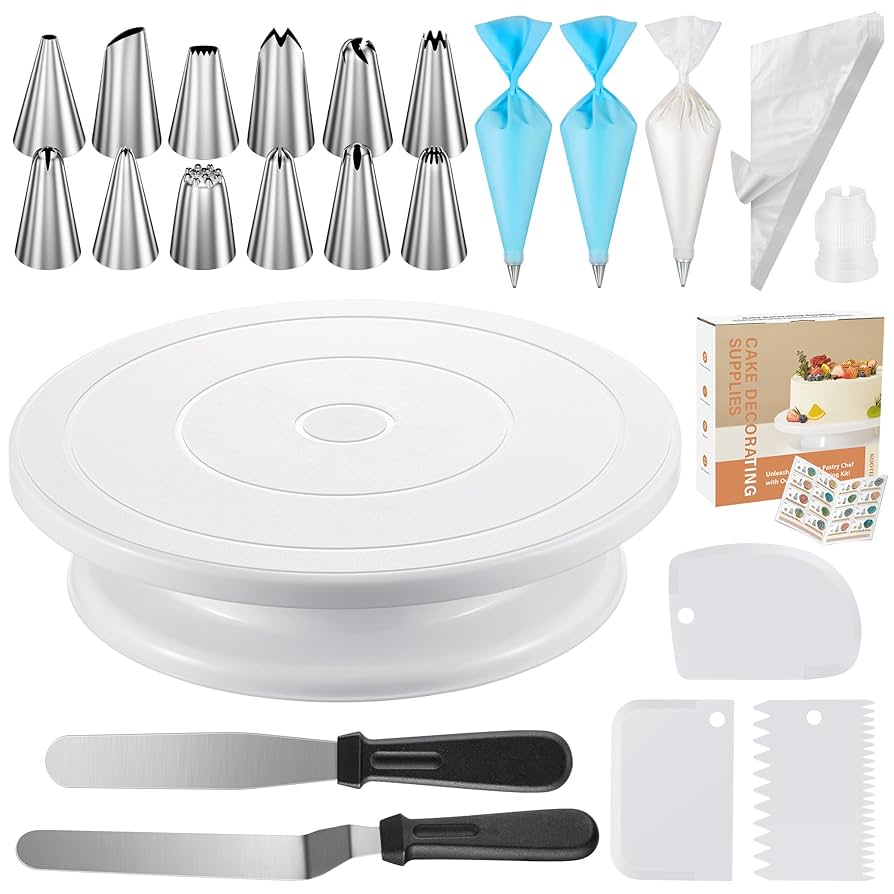
Image credit: www.amazon.com
Embarking on your first cookie decorating kit adventure can feel a bit daunting, but with a few simple tips, you’ll be creating beautiful cookies in no time. I’ve made my share of mistakes (and learned from every single one!), so these pointers come from genuine first-hand experience aimed at making your journey smoother and more enjoyable.
Getting Your Icing Consistency Right
This is arguably the most crucial aspect of royal icing decorating set for cookies. You’ll typically need two consistencies:
Outline Consistency: This is thicker, like toothpaste. When you lift your spoon, the icing should hold its shape for about 10-15 seconds before melting back into itself. This creates a barrier for your flood icing.
Flood Consistency: Thinner, like honey or syrup. When you lift your spoon, the icing should melt back into itself in about 5-8 seconds. This consistency is used to fill in the outlined areas smoothly.
If your kit comes with pre-made icing, you might only need to snip the tip of the piping bag for outlining and then dilute a portion slightly with a few drops of water for flooding. Always add water very slowly, a tiny drop at a time, and mix thoroughly. It’s easier to add more water than to thicken it back up!
Piping Techniques for Smooth Lines and Fills
Holding the piping bag correctly is key. Hold it firmly but gently in your dominant hand, with the top twisted to prevent icing from spilling out. Apply even pressure as you pipe. When outlining, don’t drag the tip directly on the cookie; lift it slightly and let the icing fall onto the surface from a small height. This allows gravity to help you achieve smoother lines. For flooding, pipe a border and then fill the interior, using your scribe tool or a toothpick to gently guide the icing to the edges and pop any air bubbles for a perfectly smooth surface.
Patience is Your Best Decorating Tool
Cookie decorating isn’t a race. Rushing can lead to smudges and uneven finishes. Allow your outline to dry for 15-20 minutes before flooding the cookie. Then, after flooding, give the cookies several hours (or even overnight) to dry completely before adding any additional details or stacking them. This prevents colors from bleeding and preserves the crispness of your designs. This is especially important for more intricate designs or when using a variety of icing colors.
Beyond the Basics: Perfecting Your Cookie Creations Further Ahead
Once you’ve mastered the fundamentals with your easy cookie decorating kit for beginners, you might find yourself wanting to experiment and add more flair to your edible masterpieces. Cookie decorating is an art form that offers endless possibilities for creativity. Here are a few ways to take your skills up a notch.
Layering and Wet-on-Wet Techniques
One of the first steps to more advanced designs is layering. After your base flood layer is completely dry, you can pipe additional details on top, creating a raised, dimensional effect. Think of adding polka dots, stripes, or intricate floral patterns. For a different effect, try the wet-on-wet technique: while your flood layer is still wet, drop dots or pipe lines of a contrasting icing color directly onto it. Then, use your scribe tool to drag through the wet icing, creating beautiful marbling or feathery designs. This is a common technique used in cookie decorating class settings to demonstrate immediate, impressive results.
Adding Sparkle with Edible Glitter and Dusts
Want to make your cookies truly sparkle? Edible glitter and luster dusts are your secret weapons. After your royal icing is fully dry, you can gently brush luster dust onto specific areas with a dry, soft brush for a shimmery effect, or mix it with a tiny bit of clear alcohol (like vodka or lemon extract) to create an edible paint. Edible glitter can be sprinkled onto wet icing or adhered to dry icing with a touch of edible glue. These additions elevate a simple cookie into a showstopper, making them perfect for special occasions like a birthday party cookie decorating activity.
Using Edible Markers and Stencils
For incredibly precise details, consider integrating edible markers and stencils into your decorating routine. Edible markers are fantastic for adding facial features to characters, writing tiny messages, or outlining intricate patterns that you can then fill with icing. Stencils, on the other hand, allow you to repeat complex designs effortlessly. Simply place a stencil over a dry flooded cookie, hold it in place, and gently spread a thin layer of royal icing over it. Lift the stencil carefully, and voilà – a perfect, repeatable design. This technique is often taught in a professional cookie decorating class.
Where to Find the Best Cookie Decorating Kits
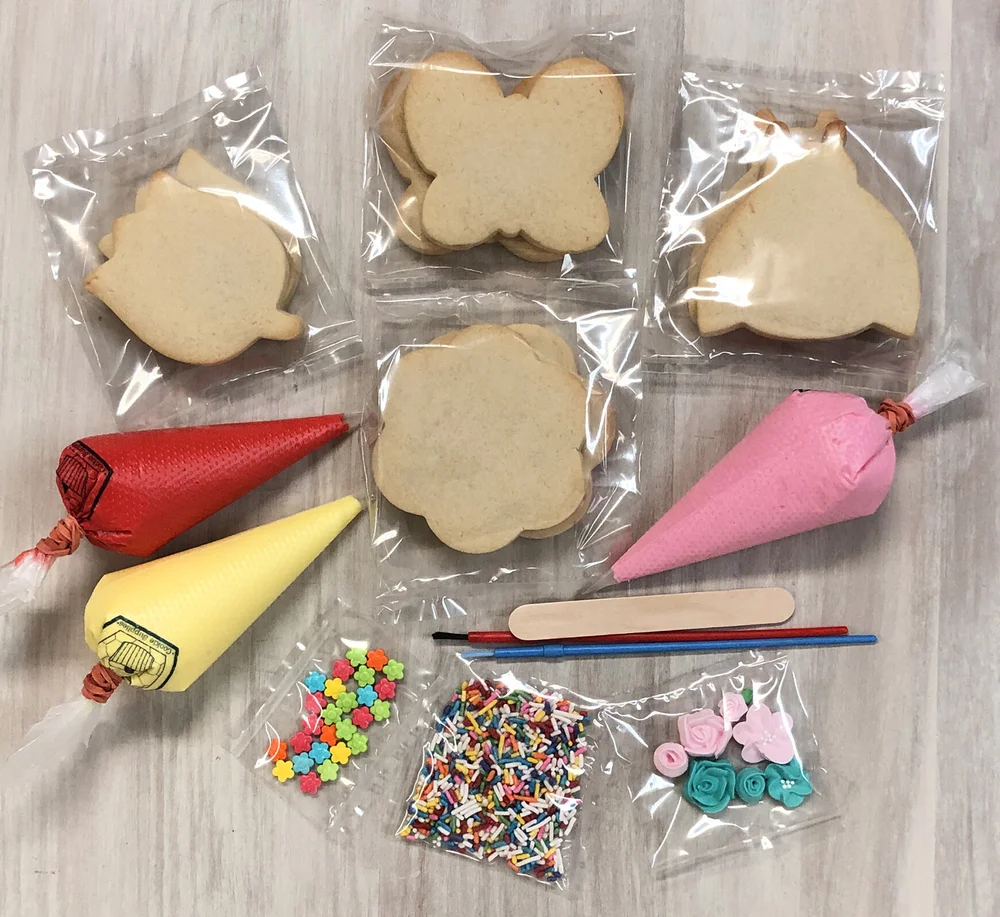
Image credit: www.edibleimpressions.net
With the growing popularity of home baking and DIY crafts, cookie decorating kits are more accessible than ever. Knowing where to look can help you find a high-quality kit that suits your needs and budget. You don’t always need to visit a specialty store; many mainstream retailers now offer excellent options.
Online Retailers: Websites like Amazon, Etsy, and dedicated craft or baking supply stores online offer an immense selection. You can find everything from a basic easy cookie decorating kit for beginners to elaborate DIY sugar cookie decorating boxes. Reading customer reviews can be incredibly helpful here to gauge the quality and completeness of a kit.
Craft Stores: Major craft retailers often have dedicated baking sections featuring a variety of cookie decorating supplies. You’ll frequently find seasonal kits (think Christmas cookie decorating ideas for kids during the holidays) and general-purpose sets. This is a great place to physically see the tools and ingredients.
Specialty Baking Stores: For the most extensive range and often higher-end tools, a specialty baking supply store is a treasure trove. While their kits might be a bit pricier, they often contain professional-grade equipment and ingredients.
Grocery Stores/Supermarkets: Especially around holidays, many supermarkets carry simple, convenient cookie decorating kit options, often pre-baked and with ready-to-use icing. These are perfect for a spontaneous holiday baking activity or a last-minute fun family cookie decorating project.
When selecting a kit, always consider what’s included, the quality of the components, and whether it aligns with your skill level and intended use. Don’t be afraid to compare a few options before making your choice.
Caring for Your Cookie Decorating Tools
Once you’ve invested in a good cookie decorating kit, whether it’s a basic set or a comprehensive royal icing decorating set for cookies, proper care of your tools is essential to ensure their longevity and hygiene. Taking a few minutes to clean and store your equipment properly will save you time and money in the long run.
Piping Bags and Tips: If using disposable piping bags, simply discard them after use. For reusable silicone piping bags and decorating tips, wash them immediately after use with warm, soapy water. Use a small brush (a bottle brush or even an old toothbrush works well) to clean inside the tips, ensuring no dried icing remains. Rinse thoroughly and allow them to air dry completely to prevent mildew.
Cookie Cutters: Most cookie cutters are dishwasher safe, but handwashing with warm, soapy water is always a safe bet, especially for those with intricate designs or made from less durable materials. Make sure they are thoroughly dry before storing to prevent rust, particularly with metal cutters.
Scribe Tools and Edible Markers: A quick wipe with a damp cloth for scribe tools is usually sufficient. For edible markers, always recap them tightly after use to prevent them from drying out. Store them horizontally to keep the ink evenly distributed.
Food Coloring Gels and Sprinkles: Always keep containers of food coloring gels tightly sealed to prevent them from drying out. Store sprinkles in airtight containers in a cool, dry place away from direct sunlight to maintain their color and freshness.
By following these simple care instructions, your cookie decorating kit will be ready for many more delicious and artistic endeavors. Keeping everything organized also makes future decorating sessions much smoother and more enjoyable.
Frequently Asked Questions
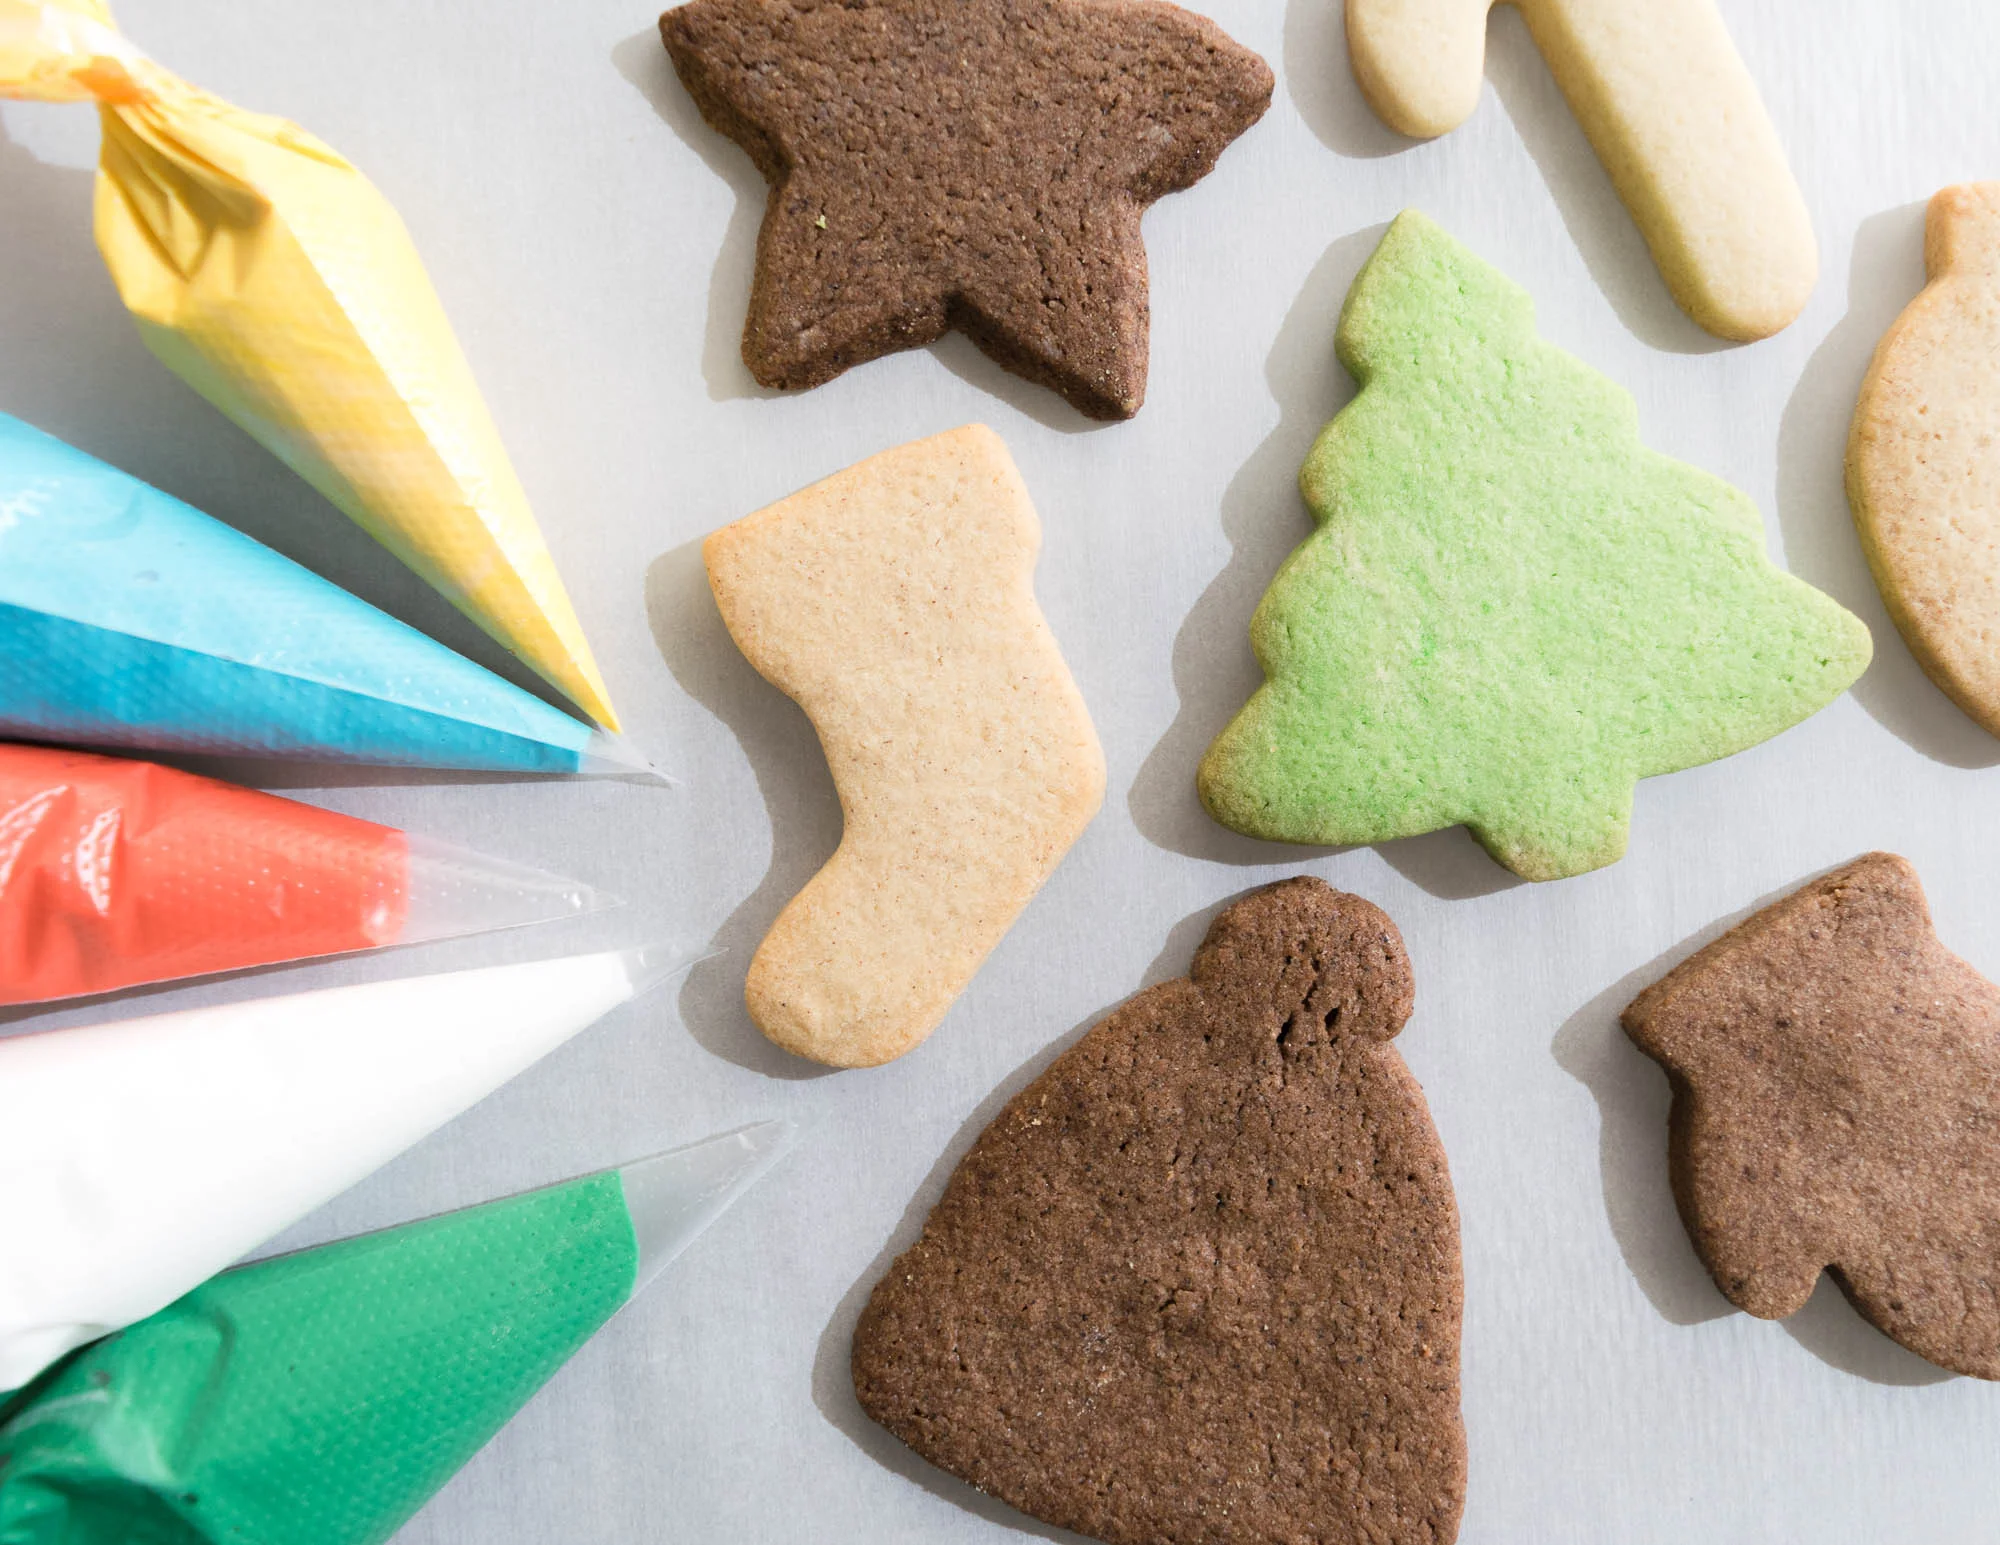
Image credit: www.thehoneyblonde.com
Q: Can I use regular food coloring instead of gel food coloring for royal icing?
A: While you can use regular liquid food coloring, it’s generally not recommended for royal icing. Liquid colors can significantly alter the consistency of your icing, making it too thin, and the colors tend to be less vibrant. Food coloring gels, found in most cookie decorating kits, provide concentrated color without adding excess liquid, allowing you to achieve rich hues while maintaining the proper icing consistency.
Q: How long do decorated cookies last?
A: Decorated sugar cookies, particularly those made with royal icing, have a surprisingly long shelf life. Once the icing is completely dry (which can take 12-24 hours depending on humidity), they can be stored in an airtight container at room temperature for up to two weeks. For longer storage, they can be frozen for several months. Just be sure they are fully dry before freezing to prevent condensation from smudging the designs.
Q: Do cookie decorating kits expire?
A: Components within a cookie decorating kit can have varying shelf lives. Pre-baked cookies and ready-to-use icing will have specific “best by” dates. Dry ingredients like sugar cookie mix or meringue powder typically last much longer, often for several months to a year, but always check the packaging. Food coloring gels and sprinkles also have long shelf lives if stored correctly. It’s best to check the individual components’ dates upon purchase.
Q: What is the best age to start kids with a cookie decorating kit?
A: Cookie decorating can be a fun activity for a wide range of ages. Toddlers (around 2-3 years old) can enjoy no-bake cookie decorating kits with simple spreads and large sprinkles, focusing on sensory play. Preschoolers (4-5 years) can handle basic piping bags with thicker icing and larger cookie shapes. Older children (6+) can often follow instructions for outlining and flooding, especially with an easy cookie decorating kit for beginners. Supervision is always recommended, regardless of age.
Q: Can I make my own cookie decorating kit?
A: Absolutely! Creating your own DIY sugar cookie decorating box is a fantastic idea once you know what tools you prefer. You can purchase cookie cutters, piping bags, decorating tips, food coloring gels, and sprinkles individually. You can also bake your own sugar cookies and mix your own royal icing from scratch. This gives you complete control over the ingredients and allows for customization, including options like gluten-free cookie decorating kit components if needed.


Leave a Reply